Defining and Deploying
Intro
This walkthrough will set up a simple entity, add it to the catalog, and provision it.
For illustration purposes, we will write an integration with Github Gist, with an effector to create new gists.
Project Setup
Follow the instructions to create a new Java project using the archetype, and
import it into your favorite IDE. This example assumes you
used the groupId com.acme and artifact id autobrick.
First ensure you can build this project at the command line, using mvn clean install.
Java Entity Classes
For this particular example, we will use a third party Gist library, so will need to add that as
a dependency. Add the following to your pom.xml inside the <dependencies> section
(see Maven
for more details):
<dependency>
  <groupId>org.eclipse.mylyn.github</groupId>
  <artifactId>org.eclipse.egit.github.core</artifactId>
  <version>2.1.5</version>
</dependency>
Create a new Java interface, GistGenerator, to describe the entity’s interface (i.e. the
configuration options, sensors, and effectors). The code below assumes you have created this
in the package com.acme for src/main/java.
package com.acme;

import java.io.IOException;

import org.apache.brooklyn.api.entity.Entity;
import org.apache.brooklyn.api.entity.ImplementedBy;
import org.apache.brooklyn.config.ConfigKey;
import org.apache.brooklyn.core.annotation.Effector;
import org.apache.brooklyn.core.annotation.EffectorParam;
import org.apache.brooklyn.core.config.ConfigKeys;

@ImplementedBy(GistGeneratorImpl.class)
public interface GistGenerator extends Entity {

    ConfigKey<String> OAUTH_KEY = ConfigKeys.newStringConfigKey("oauth.key", "OAuth key for creating a gist",
            "xxxxxxxxxxxxxxxxxxxxxxxxxxxxxxxxxxxxxxxx");

    @Effector(description="Create a Gist")
    String createGist(
            @EffectorParam(name="gistName", description="Gist Name", defaultValue="Demo Gist") String gistName,
            @EffectorParam(name="fileName", description="File Name", defaultValue="Hello.java") String fileName,
            @EffectorParam(name="gistContents", description="Gist Contents", defaultValue="System.out.println(\"Hello World\");") String gistContents,
            @EffectorParam(name="oauth.key", description="OAuth key for creating a gist", defaultValue="") String oauthKey) throws IOException;

    @Effector(description="Retrieve a Gist")
    public String getGist(
            @EffectorParam(name="id", description="Gist id") String id,
            @EffectorParam(name="oauth.key", description="OAuth key for creating a gist", defaultValue="") String oauthKey) throws IOException;
}
To describe each part of this:
- The
@ImplementedByindicates the implementation class for this entity type - i.e. the class to instantiate when an entity of this type is created. - By extending
Entity, we indicate that this interface is an Entity type. We could alternatively have extended one of the other sub-types of Entity. - The
OAUTH_KEYis a configuration key - it is configuration that can be set on the entity when it is being instantiated. - The
@Effectorannotation indicates that the given method is an effector, so should be presented and tracked as such. Execution of the effector is intercepted, to track it as a task and show its execution in the Activity view. - The
@EffectorParamannotations give metadata about the effector’s parameters. This metadata, such as the parameter description, is available to those using the client CLI, rest API and web-console.
Note there is an alternative way of defining effectors - adding them to the entity dynamically, discussed in the section Dynamically Added Effectors.
Next lets add the implementation. Create a new Java class named GistGeneratorImpl.
package com.acme;

import java.io.IOException;
import java.util.Collections;

import org.apache.brooklyn.core.entity.AbstractEntity;
import org.apache.brooklyn.util.text.Strings;
import org.eclipse.egit.github.core.Gist;
import org.eclipse.egit.github.core.GistFile;
import org.eclipse.egit.github.core.service.GistService;
import org.slf4j.Logger;
import org.slf4j.LoggerFactory;

import com.google.common.collect.Iterables;

public class GistGeneratorImpl extends AbstractEntity implements GistGenerator {

    private static final Logger LOG = LoggerFactory.getLogger(GistGeneratorImpl.class);

    @Override
    public String createGist(String gistName, String fileName, String gistContents, String oathToken) throws IOException {
        if (Strings.isBlank(oathToken)) oathToken = config().get(OAUTH_KEY);

        GistFile file = new GistFile();
        file.setContent(gistContents);
        Gist gist = new Gist();
        gist.setDescription(gistName);
        gist.setFiles(Collections.singletonMap(fileName, file));
        gist.setPublic(true);

        GistService service = new GistService();
        service.getClient().setOAuth2Token(oathToken);
        LOG.info("Creating Gist: " +  gistName);
        Gist result = service.createGist(gist);
        return result.getId();
    }

    @Override
    public String getGist(String id, String oathToken) throws IOException {
        if (Strings.isBlank(oathToken)) oathToken = config().get(OAUTH_KEY);

        GistService service = new GistService();
        service.getClient().setOAuth2Token(oathToken);
        Gist gist = service.getGist(id);
        return Iterables.getOnlyElement(gist.getFiles().values()).getContent();
    }
}
To describe each part of this:
- Extends
AbstractEntity- all entity implementations should extend this, or one of its sub-types. - Implements
GistGenerator: this is the Entity type definition, so must be implemented. Users of the entity will only refer to the interface; they will never be given an instance of the concrete class - instead a dynamic proxy is used (to allow remoting). org.slf4j.Loggeris the logger used throughout Apache Brooklyn.- Implements the
createGisteffector - we do not need to re-declare all the annotations. - If no
oath.keyparameter was passed in, then use the configuration set on the entity. - Use the third party library to create the gist.
Configuring GitHub
First, create a github.com account, if you do not already have one.
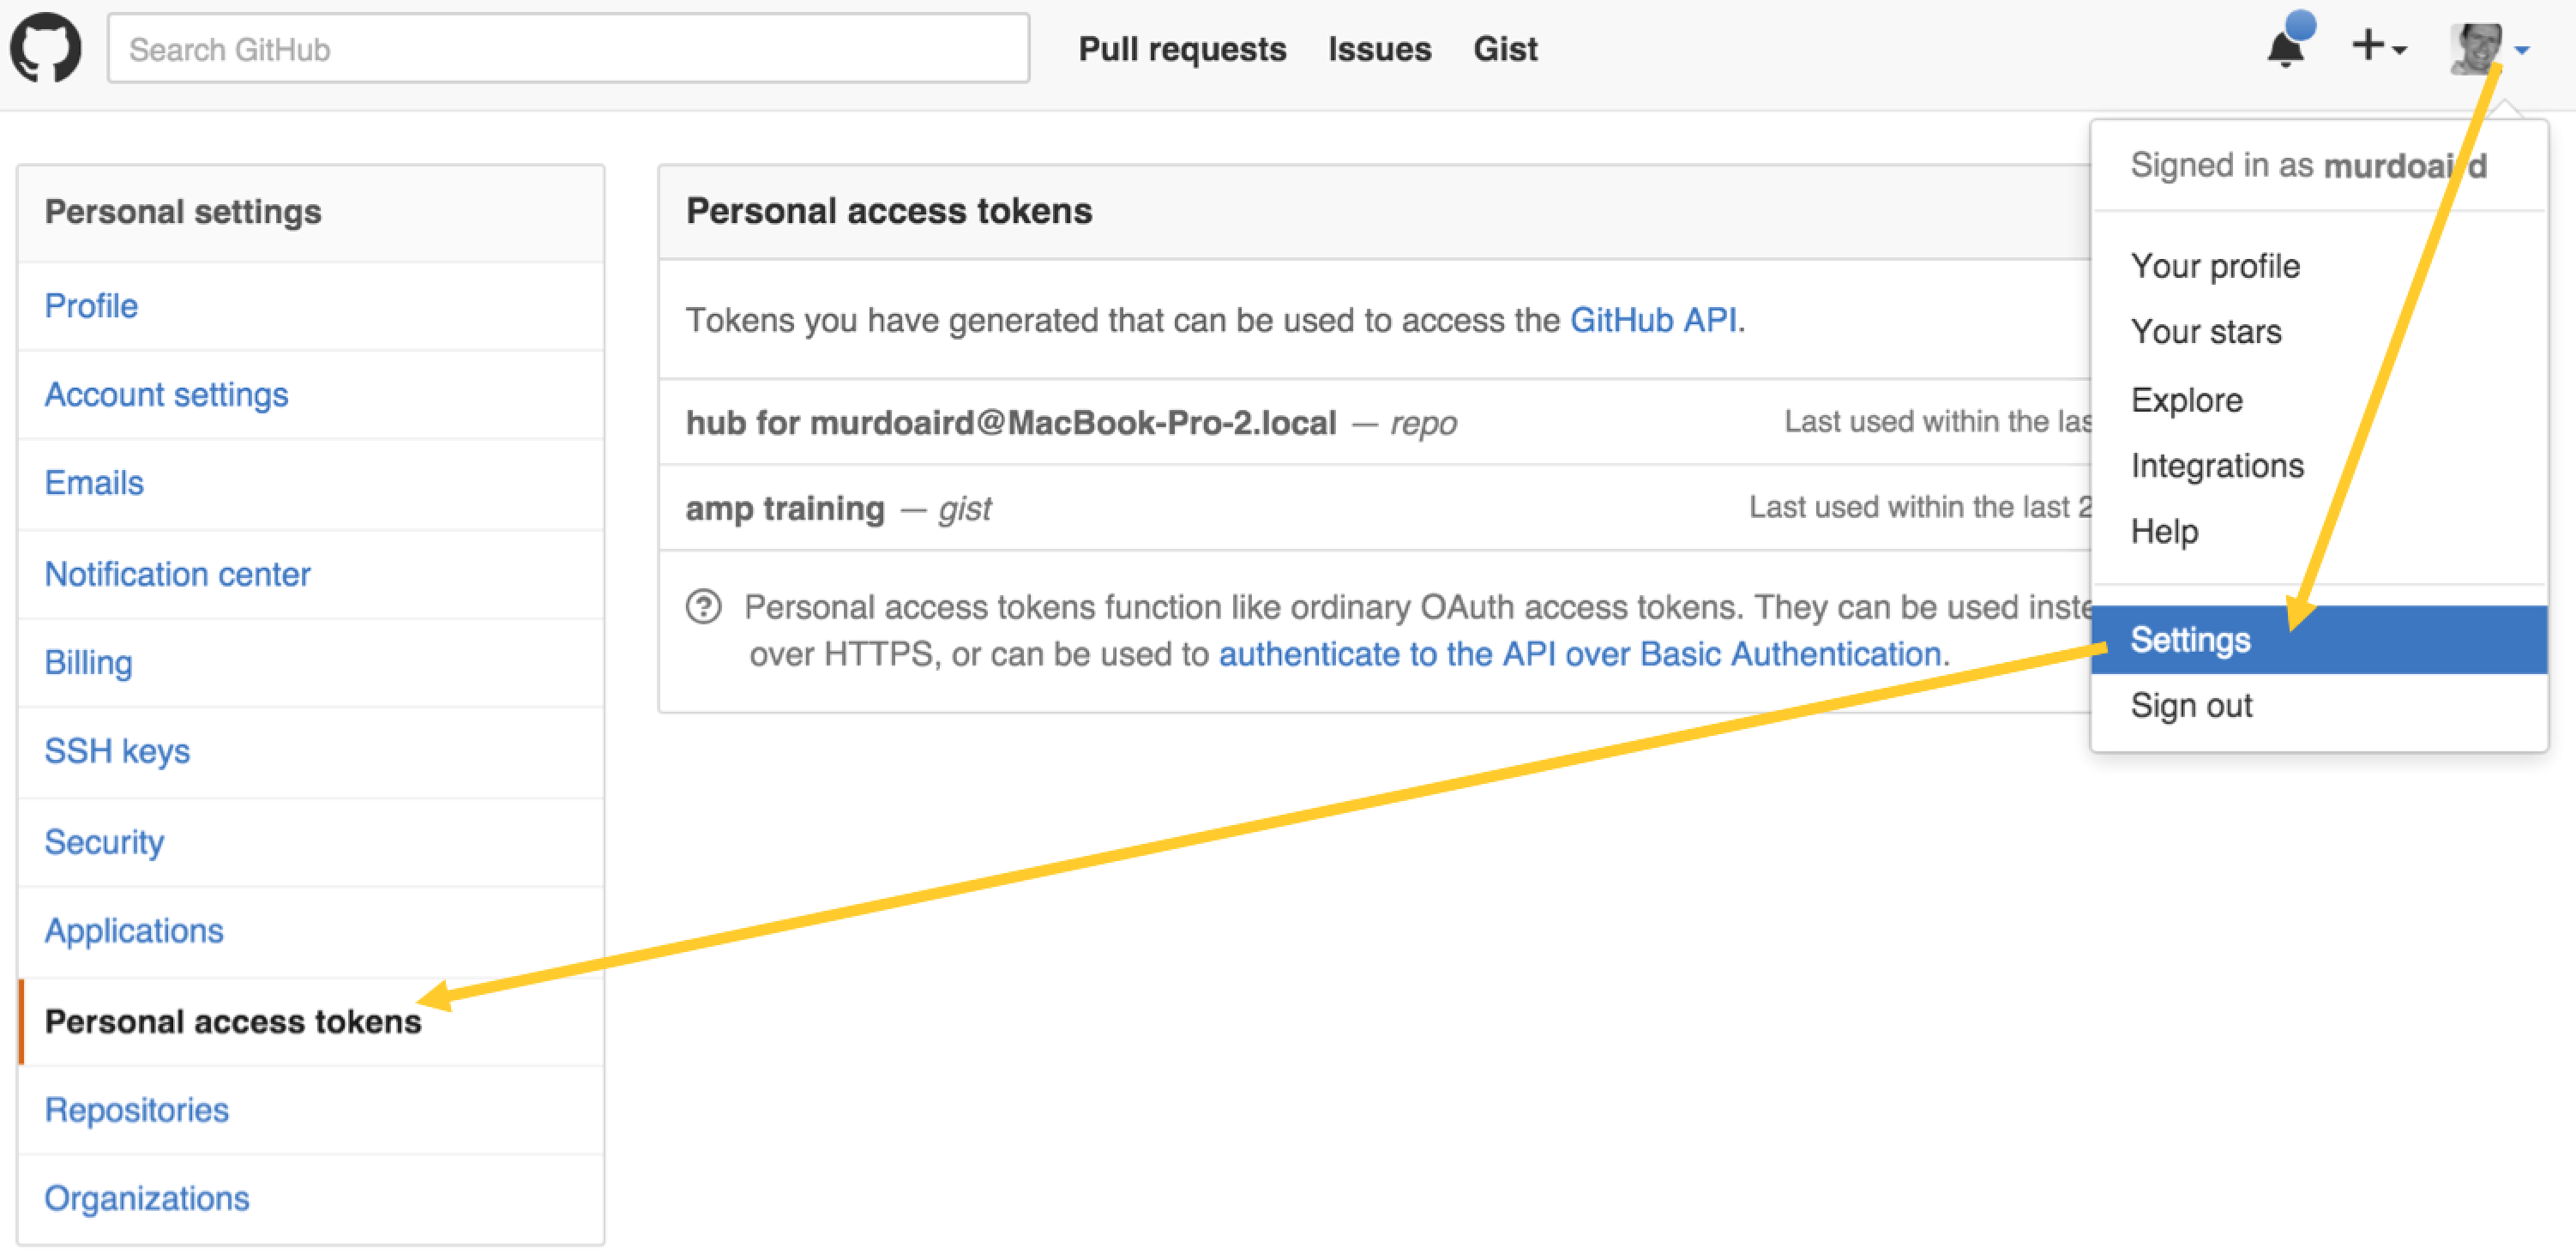
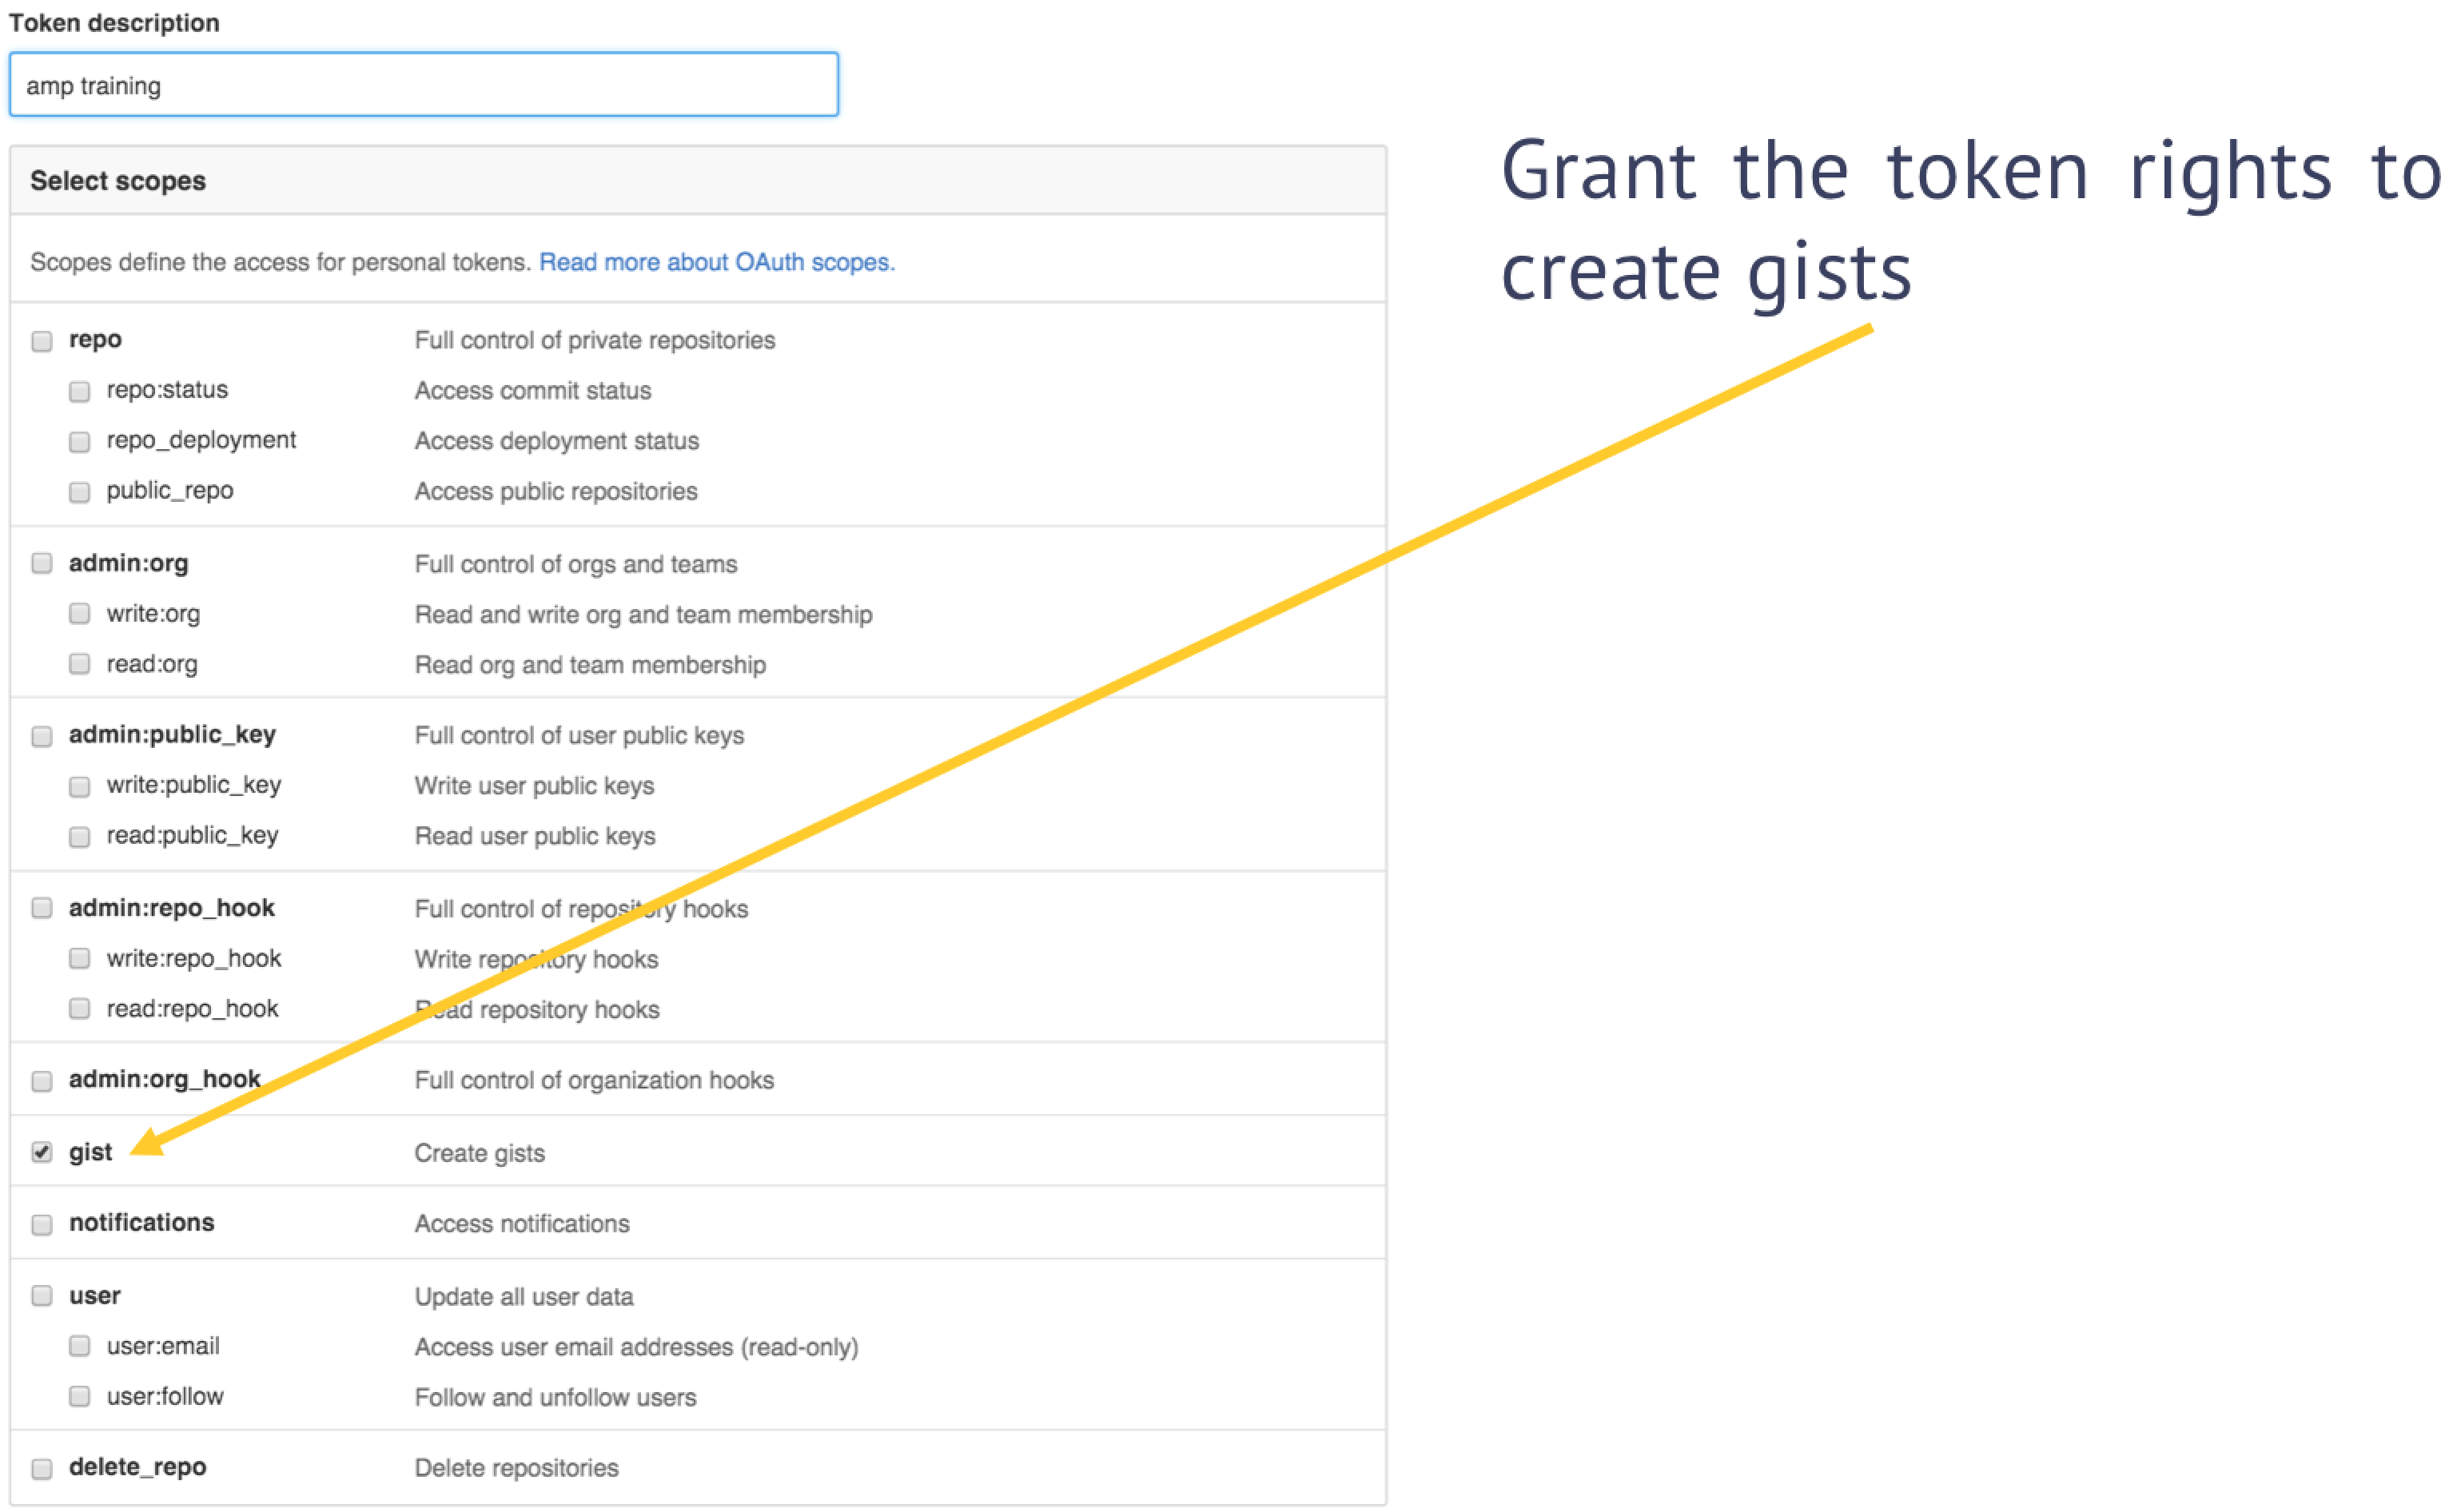
Before running the blueprint, we’ll need to generate an access token that has permissions to create a gist programmatically.
First create a new access token that our blueprint will use to create a gist:
Next, grant the token rights to create gists:
Testing
The archetype project comes with example unit tests that demonstrate how to test entities, both within Java and also using YAML-based blueprints.
We will create a similar Java-based test for this blueprint. Create a new Java class named
GistGeneratorTest in the package com.acme, inside src/test/java.
You will need to substitute the github access token you generated in the previous section for
the placeholder text xxxxxxxxxxxxxxxxxxxxxxxxxxxxxxxxxxxxxxxx.
package com.acme;

import static org.testng.Assert.assertEquals;

import org.apache.brooklyn.api.entity.EntitySpec;
import org.apache.brooklyn.core.test.BrooklynAppUnitTestSupport;
import org.testng.annotations.Test;

public class GistGeneratorTest extends BrooklynAppUnitTestSupport {

    @Test
    public void testEntity() throws Exception {
        String oathKey = "xxxxxxxxxxxxxxxxxxxxxxxxxxxxxxxxxxxxxxxx";
        GistGenerator entity = app.createAndManageChild(EntitySpec.create(GistGenerator.class));
        String id = entity.createGist("myGistName", "myFileName", "myGistContents", oathKey);

        String contents = entity.getGist(id, oathKey);
        assertEquals(contents, "myGistContents");
    }
}
Similarly, we can write a test that uses the GistGenerator from a YAML blueprint.
Create a new Java class named GistGeneratorYamlTest in the package com.acme,
inside src/test/java.
Again you will need to substitute the github access token you generated in the previous section for
the placeholder text xxxxxxxxxxxxxxxxxxxxxxxxxxxxxxxxxxxxxxxx. See the section on
externalised configuration
for how to store these credentials more securely.
package com.acme;

import static org.testng.Assert.assertEquals;

import org.apache.brooklyn.api.entity.Entity;
import org.apache.brooklyn.camp.brooklyn.AbstractYamlTest;
import org.apache.brooklyn.core.entity.Entities;
import org.testng.annotations.Test;

import com.google.common.base.Joiner;
import com.google.common.collect.Iterables;

public class GistGeneratorYamlTest extends AbstractYamlTest {

    private String contents;

    @Test
    public void testEntity() throws Exception {
        String oathKey = "xxxxxxxxxxxxxxxxxxxxxxxxxxxxxxxxxxxxxxxx";

        String yaml = Joiner.on("\n").join(
            "name: my test",
            "services:",
            "- type: com.acme.GistGenerator",
            "  brooklyn.config:",
            "    oauth.key: "+oathKey);

        Entity app = createAndStartApplication(yaml);
        waitForApplicationTasks(app);

        Entities.dumpInfo(app);

        GistGenerator entity = (GistGenerator) Iterables.getOnlyElement(app.getChildren());
        String id = entity.createGist("myGistName", "myFileName", "myGistContents", null);

        contents = entity.getGist(id, null);
        assertEquals(contents, "myGistContents");
    }
}
Building the OSGi Bundle
Next we will build this example as an OSGi Bundle
so that it can be added to the Apache Brooklyn server at runtime, and so multiple versions of the
blueprint can be managed.
The mvn clean install will automatically do this, creating a jar inside the target/ sub-directory
of the project. This works by using the
Maven Bundle Plugin
which we get automatically by declaring the pom.xml’s parent as brooklyn-downstream-parent.
Adding to the catalog
Similar to the sample.bom entity that ships with the archetype, we will define a .bom file
to add our GistGenerator to the catalog. Substitute the URL below for your own newly built
artifact (which will be in the target sub-directory after running mvn clean install).
brooklyn.catalog:
  libraries:
  - http://search.maven.org/remotecontent?filepath=com/google/code/gson/gson/2.2.2/gson-2.2.2.jar
  - http://repo1.maven.org/maven2/org/apache/servicemix/bundles/org.apache.servicemix.bundles.egit.github.core/2.1.5_1/org.apache.servicemix.bundles.egit.github.core-2.1.5_1.jar
  - http://developers.cloudsoftcorp.com/brooklyn/guide/java/gist_generator/autobrick-0.1.0-SNAPSHOT.jar
  id: example.GistGenerator
  version: "0.1.0-SNAPSHOT"
  itemType: template
  description: For programmatically generating GitHub Gists
  displayName: Gist Generator
  iconUrl: classpath:///sample-icon.png
  item:
    services:
    - type: com.acme.GistGenerator
See Handling Bundle Dependencies
for a description of the brooklyn.libraries used above, and for other alternative approaches.
The command below will use the br CLI to add this to the catalog of a running Brooklyn instance.
Substitute the credentials, URL and port for those of your server.
$ br login https://127.0.0.1:8443 admin pa55w0rd
$ br catalog add gist_generator.bom
Using the blueprint
The YAML blueprint below shows an example usage of this blueprint:
name: my sample
services:
- type: example.GistGenerator
  brooklyn.config:
    oauth.key: xxxxxxxxxxxxxxxxxxxxxxxxxxxxxxxxxxxxxxxx
Note the type name matches the id defined in the .bom file.
You can now call the effector by any of the standard means - web console, REST api, or Client CLI.

